Saturday, May 25, 2019

The Taki-Tiki Rwy

Recently, I posted here a blurb concerning the Trans-Tropics Railway, the "Taki-Tiki."  A bit of progress has been made, so here's a small follow-up on it.

After playing around in AnyRail (always a dangerous thing for me to do) I've added an end loop to the module set, bringing the total to four.  In use it'd look something like this:


Now, the two corners on the right will be built as a single 180º end loop.
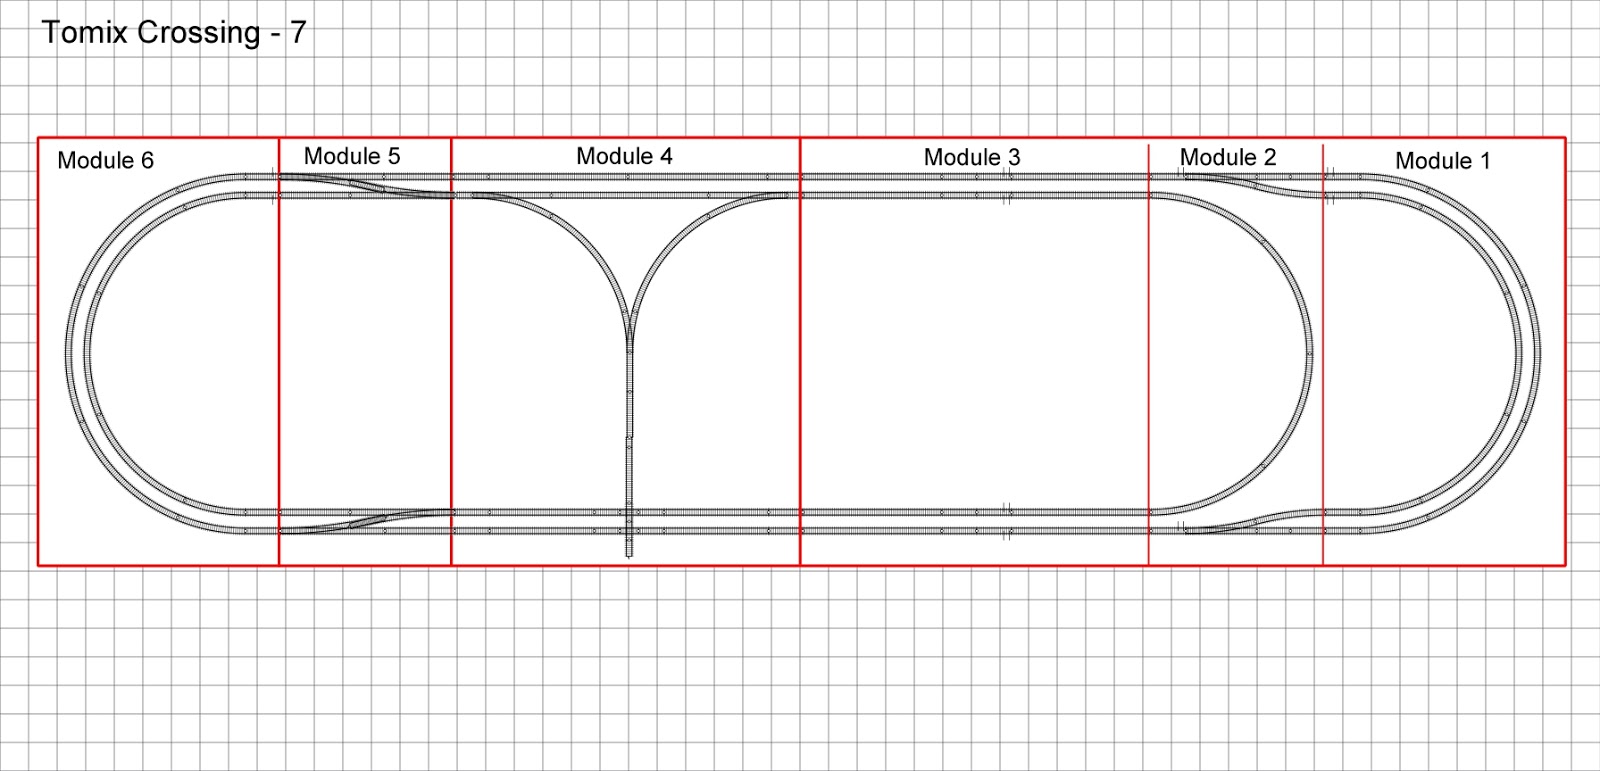
As a linear setup: 


Either way, this gives the Bandai Shorty trains a place to run, switch, whatever on their own with a minimum of interference with the "full size" N scale trains on the TTrak Inner track. 

I'm thinking that I'd run the trains so that the connecting sections between the larger loops would run counter to the Inner line.  This would allow periodic use of the Inner to move between loops and the connector as a return.  Really, I think most action could be kept separate.  The little Bandai locomotives are, basically, double ended, so no turning of a loco is needed to run back and forth.  I'm thinking that an entire show could be done and never need to leave the loops.

I have most of the track on hand or on order.  I'm anxious for it to get here so I can trial run the loops on a bench.  I've made contact with Ken, who's building module bases for others. I have contracted with him to build four for me.  These would be the two triples, a double, and the end loop.  Along with the double deep module set, I've got my summer's work all lined out.  Ha - I'm positive it'll get changed for me. I do believe in Murphy.

Being the Taki-Tiki, it'll be a sandy beach scene set.  I'm not too sure if I can, but if I can manage a few grass hut style buildings, I be a happy modeler.  The building outlines on the drawings are just place holders to give me a feel for space.

Like the double deep set, I see this as a module set that's capable of being a stand alone, small show layout (like school displays) as well as part of a larger club spread at shows.  Not to mention, a set up for home on a table or two.

Saturday, May 18, 2019

Plans, they are achanging - - -

I've been struggling with some items lately.  A stomach bug that floored me, completely. I lost my truck keys on Wednesday, too. My daughter-in-law's favorite grandfather passed away at 98.  He served on a Fletcher-class destroyer in the South Pacific in WW2.  His services were on Friday. The dentist is enjoying my trips much more than I am. What a week.

The one modelling issue that has bugged me the most is the six-module layout. 

I've decided that the inner tram loop takes too much space from scenery concerns.  So, it's going away.  Well, not too far, but to another possible project.  As soon as I find those missing Kato Hanover trams, that is. The track plan for that is derived from R. D. Kerr's Easy Trolley pages (http://www.trainweb.org/tomix/.)


Now, some of the larger structures stockpiled for here will actually fit.  More details later, as the modules progress.  First, there's a bit of repair and painting to do.  There's a base coat of paint, and then some track repair.  One of the Tomix turnouts was damaged in the move here, but a new one in somewhere "over the water" as the saying goes.  The single crossovers were originally a double Kato unit, but it, too, was destroyed by the move.  So, I'm bashing four (a pair each of L's and R's) Kato #6's into a pair of single crossovers. They make a perfect 310mm for a single, as did the factory DXO.  This is following a video by Mike Fifer of Fifer Hobby Supply.  Thanks, Mike, for all your support for the hobby.  When finished (soon, hopefully, but don't hold your breath) I'm planning to shoot a short video of them in action.

Also, I've had a bit of minor trouble keeping the module feet on the table.  Being double deep, they are just on the edge and the slightest bump slides them off.  So, a simple solution.  Each foot is in a 2x2 block bracing the corner of the module box.  I'm going to add another 2x2 just inside the existing ones and move the foot there. Problem solved. The blocks are cut, and come Monday (forecast to be rainy and stormy - can't mow, but can work on my important projects in the barn!) I'll drill and glue the new blocks in place.  Adjusting them is not an issue. I've been converted to the top-adjust system for my new construction, with consideration of retrofitting my older modules.  By the end of next week, I should have the painting all done and basic ground cover started.

The nichrome wire for the new hot wire cutters came in this week.  100' of 22AWG is a lifetime's supply, especially sharing it with a few local modelers.  You can be acquainted, but swapping and gifting goodies makes for good friendships, I've found.  Anyway, easy foam shaping (Stanley Surform tools are great!) allows for a more "vertical" scene, if only by a little. 

That's about it from here.  Now, if I could only find those lost keys . . . 😡

Friday, May 3, 2019

No rain - yet

Since the last post, it has rained another 2.75", making 3.75" for the week.  None today, but there are storms out west coming this way. At least the moss in the yard will like it. I guess.  Sandy ground, and puddles stand almost long enough for bugs to breed.

Yesterday was a fun day - not.  It started with a root canal and finished with a major grocery shopping trip.  Since it's about 25 miles to the store (and dentist, and ...) I decided to force it and help get the job done.  Benefits include staying home all day today, and saving the gas.

I managed to work on a couple of projects.  Since I like for my railroad modules to have something other than the "plywood plains" look, I use foam for terrain contours.  In the move, I lost my three homemade hot wire foam cutters, named the "Foaminators" by another modeler.  They were made from 1/2" PVC and brass bolts with nichrome wire.  So, I needed a new set.  One stick of pipe is enough for these three. The power leads are low voltage lighting cable. 


I power a cutter with a variable dc power supply I have from my ham radio daze. I did make a second power supply from an old car battery charger.  I have found about 2A current is plenty, and it only takes a few volts to do the job. I use 22ga. nichrome wire.  Pictures later, I expect.

Two words of caution: First, always have a lot of ventilation.  The fumes are toxic, toxic, toxic.  I'll do my cutting in the garage with the doors open.  We have a back door in there, so there's a good breeze when it's open.  The second place is ni the barn, near the open overhead door.  When in doubt, I also use a box fan (it was my grandmother's - nearly 50 years ago. Still runs good.)

Second, the wire is HOT! Don't ask how I personally know this. Please.  When running a hot wire cutter, if the wire starts to glow, it's waaaaay too hot. 

Also, did I mention the fumes are harmful? Use ventilation - outside is best if you can.

Number 1 allows me to reach into the interior of a wide sheet.  I have built mountains from only one piece by using tapered cutting, and stacking the cutout on top and repeating.


Number 2 has about 16" cutting span.  That's enough to reach across an Alt TTrak straight.  With that, I made the Ranch module in one pass.


It's a plain double module box.  I flipped it upside down, and free-hand drew the terrain contour on the fascia.  Same thing on the back, but I made sure that there was a bit of difference in them.

Then, in went the foam, glued in tight.  Once set (it was a day or two before I got back to it) I slid the wire of cutter #2 along the wood profile, keeping in contact the whole way. A little wiggling also helps with the shaping.  It was that easy.

Cutter #3 is the smallest of the three, but is a bit wide.  I've used all of them in one way or another.

One way I'll mention.  I clamped #2 is a work-mate table, with a piece of ply added.  The wire is at an angle, with one end into a slot in the edge of the plywood.  By sliding a sheet of foam through this, a slope is cut.  Setting the wire angle allows for managing the grade, if using the piece for roadbed.

How you can use one (or all) of them is limited by your imagination.

Oh, did I mention? LOTS of ventilation, the fumes are toxic!

Wednesday, May 1, 2019

When it rains

Another 1" of rain last night.  I guess it's trying to keep the moss in the yard from drying out.

A little more on the Taki-Tiki design.  I messed around with it a bit more, and added a shorter (2') module between the 3' pieces. 


This adds a connector between the two switching areas, off the community tracks.  I'm thinking these three modules, with Taki-Tiki facing the front, could be a stand-alone display for a one day (or even 1/2 day) school or library display. I've done a few of them in my time, and had fun doing them.  Ah, the good old days.

After checking my track stock, a small order for a few pieces more and this project is crowding its way to the top of the to-do list.

Another small layout I've done is called the Booville Central.  It's based on the Microtrains Haunted Hamlet collection.  The set of buildings come with a single round base.  I wound up with two bases, but that's a long, boring story for a never time.


I make a loop of Tomix C177 (7" radius) on each base, along with a few buildings.  A tram is run there.  I favor the Kato Hamburg trams or the Pocket trains for these.

Then, a Figure-8 using 249mm radius Kato surrounds both bases.  A small passenger train loops around on this track.  So, on one table, a Halloween village with three trains! 

I prefer dark blue (for water) or black (it is Halloween, after all) table covering.  I'm having good service out of the cheapest queen flat sheets I can get.  One covers a 6' table just fine.

Booville at a library

Yeah, the video calls it something else, but Booville Central is what it's become, and what it'll probably stay.  Well, it's time to shut this thing down and get to the barn and work on some good stuff.