Monday, December 2, 2019

Here a wire, there a wire, everywhere a wire ...

I have been studying the Dreamer project layout with an eye to powering it.
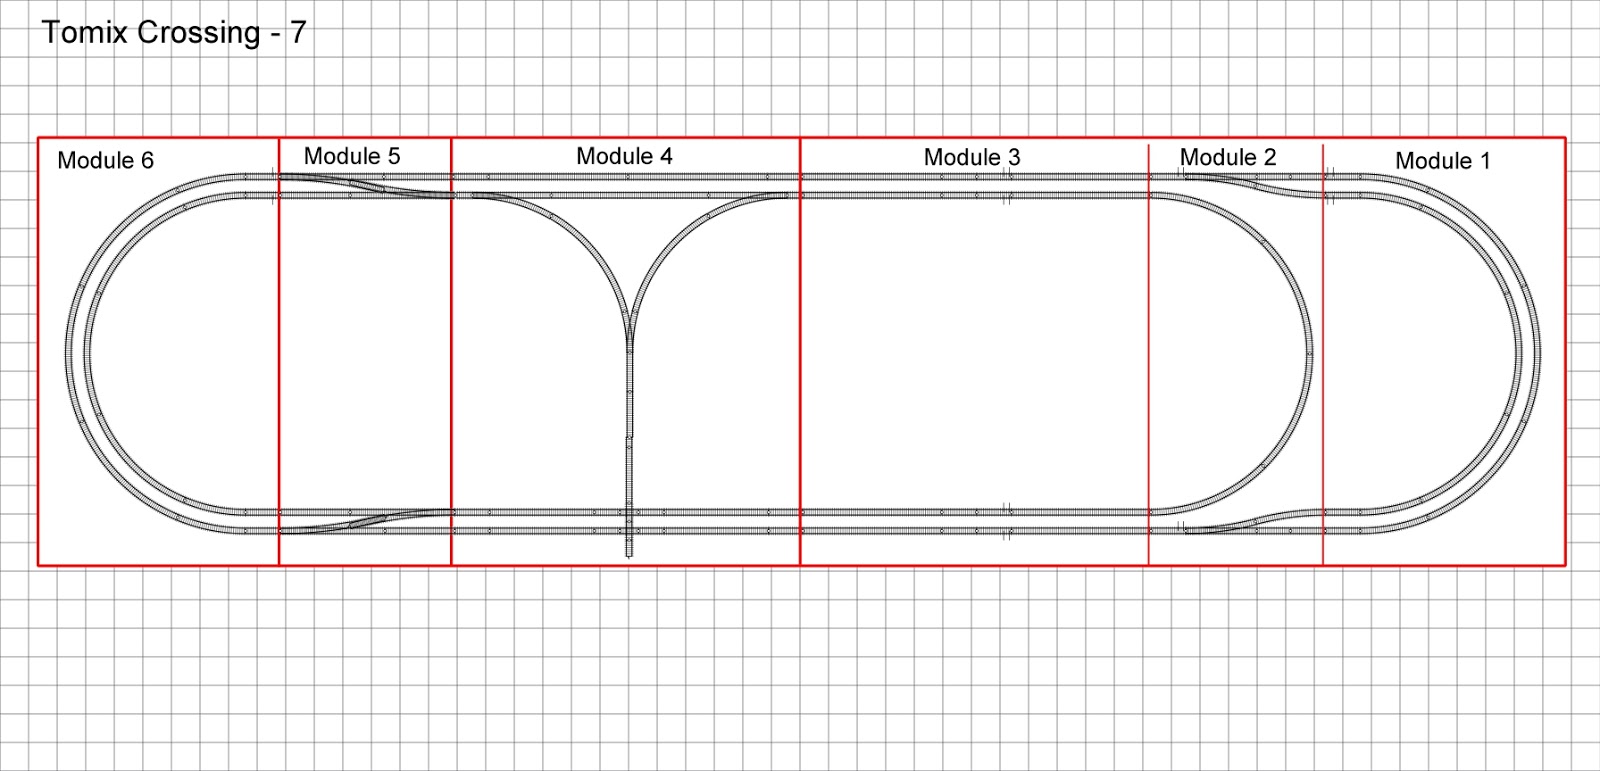
The result is shown here:


I assigned letters to the outer loop track connections, and numerals to the inner loop places.  Oh, #4 and #7 were not on the previous drawing.  The trams are the trivial part, and designated T1 and T2.

What looks like, and is for all practical purposes, a long passing siding to the left is built as a 'normal' TTrak inner track. This fits the original purpose, to be a TTrak layout.  So, the track polarity, with similar connections, is opposite the outer.  This would be a big problem at the double crossover, as well as at the points on the 'C' module.  The siding is a problem. Solvable, but still a problem.

The solution is to reverse the polarity on these modules, so the inner and outer lines match.  But, that would mean they would be incompatible with use in conventional TTrak setups. 

The power is brought together through Kato 3-way extension cords.  As I looked at the drawing, I began to realize the whole of the inner siding could have its' polarity flipped by combining all these feeds to a single point, and inverting it there.  Looking at the diagram, that is done at the "Red" 3-way extension. 

I took a 3-way cord, cut the wires, and then spliced them back together reversed.  Problem solved.  I have wrapped it with red tape, to identify it for future reference.


Now, I think I'm ready for hookup and connecting the modules for a 'final' time.  That's with the 'Red' and 11 stock 3-way's, plus a home-brew one for the tram loop, since that is all Tomix connectons.

I am so ready to start running trains, and concentrating on structures.  Finally,  I think. Fingers crossed.

Saturday, November 30, 2019

Glueing feet whilst listening to Arlo G . . .

It's been hectic, family wise, so not much modeling gets done.  However, I'm improving the feet on my modules.  With the change over from (bottom adjust) bolts to (top adjust) set screws, I needed to do something with the sharp end of the set screws. At first, I just tried to blunt them on the grinder, so they wouldn't scar table tops or tear cloth drapes.  That was only moderately successful, and needed improvements.

So, I settled on adding acorn nuts to the ends.  I like the solution, but the final part came clear when I saw the feet at the North Texas T-Track group.  They are using standard hex nuts, but epoxy gluing them in the screws.

So, I adopted the epoxy idea, and am epoxying the acorn nuts to the ends.  Much better, in my humble opinion.


This afternoon, I've completed my second set of 24 set screws.  With the ubiquitous 1/4 - 20 threads, of course, per TTrak guidelines.   I've used 2"
and 2 - 1/4" set screws. I tend to favor the 2 1/4" version. Just something
personal.


The first two dozen are already installed, and about half of these are designated for specific new modules under construction.  After that, I need to survey which older modules will benefit most from being upgraded.

I have plenty of acorn nuts.  So far, only about half of the bag bought a while back have been used.  So, another buy is in order.  I can order boxes of 25, so I'm thinking two boxes will be about right.

Arlo does the definitive "City of New Orleans," for what my opinion is worth.

Tuesday, November 19, 2019

Fall IS a four-letter word

I haven't done much model building lately.  I tried to break the front sidewalk with my right knee.  The concrete won.  After three trips to the doc, x-rays (out-patient, he doesn't have a machine) and a DVT scan (ditto), I'm fortunate that nothing broke or cracked, and there are no vein blood clots developing.  Those things are nasty, at the least. 

So, having scraped a deep layer off the leg, and who knows what soft tissue bruising, I am on the mend.  I didn't even try to drive for a month or five weeks - trying to lift the foot from the gas to the brake was too painful to do properly. With not feeling worth anything, I haven't done any work on the layout or the buildings. 

Now, I'm not fully back, but much better.  I even spent a day in 8th grade ELAR class (as a sub, not a student. Duh.)

However, I did spend some time on the layout module arrangement plans,  and I shook them up just a little bit.  I'm marrying two multi-module sets together.  Only one end loop had to be set aside.  Here's the new plan (subject to tweaking):


That's the Trans-Tropics on the right, and the Clovis, Jal & Kermit as the five modules on the left.  It's going to be a long winter's project, especially in the garage.  At least, here in North Texas, we usually (ha!) get a decent number of mild to warm winter days.  So, this garage layout won't have to wait for spring.

Now, work on the buildings is moving forward on the bench.  Two Randy Brown models are progressing. They are Tiny's Diner and Paco's Tacos. These will go on the Taki-Tiki, somewhere.  So much else to figure out there.


Even the unused end loop from the CJ&K will get its' scenery as well.  Big plans, I just hope not too big for me.  We'll see.


Wednesday, October 16, 2019

It's alive - the Taki-Tiki Rwy!


Well, at least off life support and on its own.  I'm talking about the Trans-Tropics Rwy. layout.  It started out with the outer loop worked well.  The inner track complex, however, was a different story. I spent a good part this evening debugging it.  It didn't surrender its' secrets willingly.


There were two problems, as it turned out.  First, there was a short on the inner track complex.  It turned out that I had crossed the feed wires to the loop on the lower module in the drawing.  I don't understand how that happened - I was SO careful.  Yeah, right.  At least the wires went to a screw terminal block, and were easy to reverse.  That was the easy part.

Then, there was a dead section of track in an area where the power routing turnouts should have handled it.  After a time of close inspection and snooping with a voltmeter, the problem was isolated.  One of the Tomix track joints on the bottom loop was missing a joiner between rail sections. Once that was replaced, power was flowing to the right places, with the right polarity. Yea!  I'm sure glad I got some new Tomix joiners with my last order of track from Japan.


A Bandai Shorty locomotive was test run around the tracks.  It made it, but not easily.  I expected as much, since it has been sitting in the garage for a long time as I slowly made progress.  The track is very much in need of a thorough cleaning.  So, tomorrow, the track cleaning,  and then address some rough spots.  The track pieces are connected properly.  I inspected them closely, and will again tomorrow.  I'm thinking, though, that the light Bandai (4-wheel) locomotives are going to need a really tweaked track. A quick first look before shutting down tonight suggests that the turnout frogs may be a bit high, and a little judicious filing could be in order.

I think trying a Bachmann MDT switcher could be worth while.  It's a 6-wheel loco, but I'm expecting the slightly longer wheelbase will handle the 103mm (4") and 140mm (5.5") radius curves in the inside areas. More fun for tomorrow, I hope.

Even so, I'm hoping to shoot a little video of the layout in operation over the weekend. 

A while back (in my SouthWest Traker days, pre-2016) I made a little box that plugs into the Kato connectors between the throttle and the track.  It has a 15-0-15v meter, and a 1-0-1a meter.  It was very useful, but I wish the ammeter was 0.25-0-0.25a in scale.  That would be more useful with the low current draw of today's locomotives.  And, yes they are good ol' swingin' needle analog meters.  I love 'em.

Where did the time go?

Here it is, mid October already!  It seems as if it was early September, just yesterday.  Oh, well.  A few doctor appointments, burning heat (too hot for the ban or garage for work,) vehicle issues, yada-yada.  Gets in the way, life does.

Some more building kits is in progress.  I have a pair of the Grandt Line Reese Street kits.  Each has parts for three small houses, plus two sizes of lean-to's to be used however is desired.  While they can't help looking a bit similar, there is enough to make each unique.  So, they are spread over the work table.  And, there are enough left over panels to use in other kit-bashing, down the road.  So, that's some progress.

I did finally test the new layout.  The outer loop is fine, but the inside areas have a short somewhere.  With 70's F in the forecast, and several tasks done, maybe I can get out to them this week.  No promises. Just today, I wasted ~$1,000 of good train money. Spent it on dental bills and tires for the truck. Not a penny for the railroad. Sob.

I was looking for something else (yet another honey-do project) when I came across where I am storing some On30 items.  So, now, that's another thing to distract me . . . not a hard thing to do these days.

So, that's about as far as it goes for now.


Saturday, September 28, 2019

Track Progress

Well, very slowly.  I missed most of this week with family issues.  The worst one was Thursday.

We got up early, drove 350+miles to west Texas to visit Cindy's mom in a nursing home.  She kept begging us to send her husband, Jack, to get her and take her home.  He died in the summer of 2017.  Alzheimer's is a nasty condition.

After about an hour and a half, we left and drove back home.  Recovery Friday was a total washout.  Today (Saturday, I think?) I was able to work on the modules.


Note the end module on the left.  It can't be wired as a "normal" TTrak module in this scenario.  The Inside track must be the same polarity as the outside, as it's not "Inside" but rather a passing siding for the "Outer."  However, in other setups, it may be a "normal" end module.  So, I had to revise the wiring and add a terminal block and wiring to the track. In that way, it could enable the inner track polarity to be reversed, depending on the setup.  Not switchable, but swapping connections on the block at setup time.  If I just hadn't put the next module in there.  I never intended to do so, but it just got in there anyway . . . and it does look good there. Oh, well.

Then, there was a spot that kept bouncing the locos pretty bad.  I had missed getting the coupler on the rail properly.  Fixed that, and the power feed there, too.  I've had an SD-40 (Conrail Blue) and a B-23-7 (UP yellow) running reliable laps for over an hour (one at a time - DC for now, DCC later on the outer loop.)  I still need to to the "sweetening" on a pair of Kato #4's to hopefully end the occasional picking-the-points problem.

The inter-connected inner loops seem to have a short somewhere.  Since they span four modules, with the special Shorty loops inside them all interconnected, I'm sure it'll be easy to trouble shoot. NOT!  I'll spent the rest of the weekend thinking them over, and see what happens next week.

Oh, well, it's a lot closer to being good than ever before, track wise.

S/W Joe

WA5UNK

Monday, September 16, 2019

Half gone - where?

Oh, man, September is slipping by with not much modeling to show for it.  When I do get time to sit at the workbench, I'm generally feeling too tired to do much of anything.

I did finish three buildings.  They are the AMB_Laser Kit LK-605 Sonny's Shack (2-pack per kit) and the Randy Brown Models N-102 Fire Station.


The bright one on the left is to be a surf and scuba shop on the beach, hence the bright colors.  It "needs" an HO beach dude, on a surfboard, on the roof.
Remember, this is N, so HO is approx twice life size.  That should be a good size
for an advertising sign, eh?

It's sibling, in the middle, and the RB kit on the right haven't been assigned a specific purpose, just yet.  But they will be some sort of businesses.  Something for the beach.

On the bench now is the start of two more RB models, N-105P Paco's Tacos and N-905 Tiny's Diner.  No progress picture, as they are still piles of parts.  Here's the factory pictures: 


Yep, they'll also be on the beach modules.

I'm thinking that some small houses will be needed, and a couple of the 3-packs of Grandt_Line 300-8023 Reese St. Row Houses should be good.  That's six places, with optional additions to make them all unique.


Okay, change of subject here.  Another of my malingeringly slow projects is a Tam Valley Train Shuttle.  No longer available, it's a DCC exerciser for locomotives.  A loco can be set to any 2-digit address, and it'll be shuttled back and forth on a linear track.  How it works is clever.  After being told that such a circuit couldn't be done in DCC, they set out and did it.  It's a truly neat, unique product.  It handles a 99 possible 2-digit addresses, no programming.


I'm glad I bought one, along with the optional 2X16 display.  With that, it can accommodate locos with 4-digit addresses.  The address is programmed into the unit (it's trivial, even I can do it!)  I don't remember right off, but I think there's a limit of 16 of the 4-digit addresses. Don't quote me on that.

Any way, it's a quality little unit, with its' own DCC generation, so the only other thing needed is the supplied wall-wart. I'm putting mine in a small wood box, and mounting an ESU decoder tester on top.  All in all, a convenient stunt box/test station. 


My tester is a slightly older model board, but it looks quite similar.

So, I guess I am getting a little bit done, it just doesn't seem like it some times.  Oh, well . . .

Monday, August 26, 2019

With August Winding Down . . .

As September approaches, it's been HOT in north Texas - about 102F today (about 8-10F above "normal,) with the Temperature Humidity Index over 110F.  The morning started too hot to endure it even in the garage. So, I've retreated to the "office" (her name for a spare bedroom that'll never have a bed while we're here!) and worked on drawings and sketches to settle how to wire the loop modules.  I think that's done, but will have to wait for cooler time to implement it.  That may be tomorrow, IF the promised cool front arrives and does its job.


When not thinking about wiring, and doing chores around the house, I've started on a couple structure kits.  I have a good stock that I've accumulated over the years, and now seems to be a good time to start on them.  I'm thinking that as I finish one, I'll make a "blind" reach into the bin and whatever comes out will be the next build.  It should make for a fun fall season.

Here is what I've done so far (none are finished).


The bright one on the left is to be a beach business, "Big Jim's Surf and Scuba Shop."  I'm wanting to find an HO beach bum to mount up top on a surf board.
An HO 6' figure looks about 12' in an N scale setting. :)

The other two don't have a specific use in mind yet.  Eventually, when finding their way onto a specific module, something will occur.  It usually does.


Wednesday, August 14, 2019

It's a long, hot summer . . .

I'm not getting as much done as I'd like, with the heat and I not going together very well.  Any work on the modules has to be done mornings, along with mowing the grass, etc. Even so, the junction has the track down and ready to be wired with track power drops on all three lines.  The gap in the straight section, a non-Kato length, has been closed by the simple expedience of taking a slightly longer piece of track (I used a 124mm section) and cutting it to fit, 101mm nominally.

The single module, with a short siding, will be tied down next. Then, the wiring on it will be done, too.  I'm learning that most (all?) modules should have power drops on them.  One never knows when they could be needed in a future setup, eh?

Work on structures is starting, albeit slowly. Very slowly. As they progress, pictures will follow.

As a running layout, I've settled on using a pair of the double-deep modules to complete the loop of the Trans-Tropics Rwy.  Here's the configuration:


The two modules on the left are the "borrowed" pieces, an end cap and a "C" configuration module.  Overall, about eight feet in length. Don't put too much stock in the scenery there, I just grabbed the little available in AnyRail to keep it from looking so bare, so "plywood plains." 

This has been exported into TrainPlayer (I'm running 7.0) and I tried it out for an evening.  A passenger train was set racing (indicated 40 mph!) around the outside loop. The inside was set up with a mixed freight, plodding along at 20 mph with its' eight cars and caboose. My freights have cabooses. Period.

After running a few laps, I started playing with the various routing options with the two ovals and the TTrak inner main.  eventually, I switched the eight freight cars onto the two sidings and the four yard tracks. That left the loco (an SW-1200 class switcher) and the caboose to finish the evening, running easy.

The TTrak outer main had a steam loco and three cars, a baggage and two Pullman coaches.  They looped steadily, with an occasional variation to use the passing siding at the left end, just for variety.  Hmmm, the next time, I may park another train over there and alternate which one is making laps.

I could also do the same with the inside line and ovals, but I'll try to not get too carried away with it.  After all, tonight was the first time I've successfully run two trains at once in TrainPlayer.  It does it just fine, me, not so much, yet.


Friday, August 2, 2019

A bit more progress. I guess.

I've made a little more progress on several fronts, I guess.  I just can't seem to pick one and "just do it."

I have the track laid out for the two modules that followed me home from the Build-A-Thon, a junction (which I had ordered) and a single (an orphan I adopted.)


With the junction, nothing fancy at all on the track-work,  Right now, I'm leaning towards simple, rural scenes.  It'll have to play out to see just what will actually be there. Yep, I've got a piece of track to cut to fit, but that's an easy-peasy thing to do.


I am going to have a simple siding on the single module, using a Kato #4 and 186mm straight track.  Nothing fancy here. I'm thinking of building a dirt mound on the end of the siding, since there's not enough room for a bumper.  I have done that before, and I like how it can look.  It may even have an inset pocket to clear the coupler.  

Years ago I did a module like this (now long gone, R.I.P.) and liked it.  So, now's a good time to do another.  As to what's on the siding, I don't know just yet.  I'm waiting for the module "to tell me what it wants to be."  I could say the same about the junction as well, but it is "whispering" a bit louder to me. Kinda.

About that orphan thing.  As the guys were cutting out the pieces of MDF for the various ordered modules (about two dozen, I think) there were scrap sections remaining that generated several unordered single modules - orphans, as it were.  This one just seemed to jump into my hand, so I brought it home like a lovable, lost puppy.

Last for today, there's the fourth module of the Trans-Tropics Rwy.  This is the connector for running the two loop modules end-to-end, rather than the 180º configuration in the previous post.


Like the other two modules, the track isn't fastened down just yet.  For one thing, the temperature and humidity are very high today, and the garage is just too miserable to do any work.  Also, there's a bit of indecision on the connector.  I want a grade crossing across the twin main lines, but I do NOT like the new style KATO track pieces.  The old style more fits what I like, so I'm going to have to go another way.  One of the Blair Line Wood Grade Crossings may just fit the bill. And look better, too.  I must go box-diving to see it I may have one, somewhere.


Y'know, the Blair Line 077 Wooden Truck Dump Kit may be what the single is wanting. Hmmm . . .


Wednesday, July 31, 2019

Golden Spike! (or Golden Screw?)

Last Saturdaay, 2019/07/27, my local (even if I'm 40 miles away) had a "Build-a-Thon."  between 18 and 24 people participated in the come-and-go event.

With various people pitching in on various tasks, over two dozen modules were framed, painted, and in some cases, tracked with power leads.  I had committed to one T-junction module.  I had the track laid aside for it, no problem.

As it turned out, some of the off-cut pieces were used to make several unclaimed single TTrak modules.  I claimed one of those, as well.  After getting home, a dive into the barn revealed that I do have the track pieces for the single module. Yea! No track to buy!

No pictures of these just yet, I mean, after all, one Owl Brown box looks much like another, eh?  Next week, it should be applied, and pictures taken then.  Don't expect any surprises, track-wise, just simple one with, perhaps, a (very) short siding on the single.

Now, on to the new Trans-Tropics modules I've been planning. I have the track down on three new modules.


It's been hot in the garage, so only mornings or early evenings are tolerable.  However, these three (of the four) have the track mounted.  All have screws except for the small inner loop in the last picture.  I'm thinking that it will remain loose for easy module joining.  The joints in the Tomix track don't line up with the Kato (default of the TTrak-N world) I elected to go with this compromise.  It shouldn't be an issue with scenery.

Wiring drops for track power, as well as control leads for selected turnouts, are in place.  Tomorrow or Friday, I hope to be mounting barrier strips for track power interfacing.  I really need to do something like this, since Tomix and Kato use so totally different connectors.

Maybe, over the weekend, I can run trains at home for the first time in a long time!

The last of these four modules will probably get its track in the morning, or the next day, family tasks permitting. 

Friday, July 26, 2019

What Happened?

It's been three and a half weeks since I wrote a post.  Where did the time go?

Well, some of it went with the health of her mother.  She has rapid-onset dimensia, and could no longer live at home alone.  So, Cindy went to west Texas (~350 miles) to help her brother select a care facility, and get her admitted.  It's done, but it was a hard time.

In the meantime, I had doctor's appointments (routine follow ups, no excitement) to attend and other things around here, so I didn't go.  At any rate, it hasn't been a time for model trains or planes.

As the dust settles, I'm getting back to a pair of project ideas.  First, since the track that was attached to the double deep modules was pulled off to allow painting the bases, I figured it's a good time to paint and weather the Kato and Tomix track being used in the modules.  I didn't realize just how much track I had on there!

At the same time, the Trans-Tropics Rwy. track is being weathered, as well.

I'm not saying that I do a great job, but at least it doesn't look like it's shinky new out of the package.  Which a good bit of it is, but that's another story for a never time . . .

As for the planes, I'm building a balsa model with tissue paper covering because I just want to.  Also, there are a few "craftsmen style" structure kits for the train layout, so the planes help retrain me for working with wood models.

I'm doing the track painting in the garage, and it's starting to get warmer there.  So, I'd best cut this off and get more done before it's too hot.

Monday, July 1, 2019

The Track Fitting for the Taki-Tiki

Today was a good day for the Trans-Tropics Rwy.  With all the track finally in hand, the initial assembly and fitting to the track to the modules was done.  No track is attached as of yet, but it has been fitted.


The modules, from front to back, are the Trans-Tropics Rwy-10, the -14, the -13, and the -End Loop. No, there's not going to be 14 modules in the set.  The numbers refer to the iterations I went through settling on these track plans.  Obviously, an island - beach type theme is planned.  So, I  painted the module tops in "Riviera Sand" to try to look right in the places where bare sand shows through the ground cover.

Overall, it has gone pretty much as planned. The -14 has a small issue (seen here:)


There's a small gap in the track near the left front.  I'm going to work on that tonight, to figure why the plans and actual track differ. It's just a part of the fun, figuring out where I had a "Doh!" moment.  If this is the worst that happens along this project, then Mr. Murphy is being kind to me.  Ha, like that'll happen.  The rest are as drawn.  Hooray for AnyRail!

With errands tomorrow, and who knows what else later, I'm hoping to have -13's track fastened and powered by the weekend.  Here's hoping!

So, Mr. Ken, this is the plan for the modules you made for me. 

Saturday, June 29, 2019

Plunder!!!

Today I received a shipment of the final (I hope!) track pieces for the four Trans-Tropics Rwy modules. 


And, along with them, the double-deep module set (6).  Add to that a few unfinished modules - track, but no scenery, yet. 😟

With summer arriving in fill force, working hours are limited.  I just don't handle the heat like I did 50 years ago.  So, it's well past time to reorganize the small indoor work space and bring in modules, one at a time, and FINISH SOMETHING!  Sorry, just yelling at myself.

Anyway, nothing shattering in news, just minuscule steps forward.  At least they are forward. I think.

Monday, June 17, 2019

Spreadin' paint

I been working on the first (of two, hopefully) coats of paint on the big modules. Here's a couple pictures whilst in progress.  I had to pause and open more paint, so I grabbed the camera, too.


They are fully covered with the first coat, now.


From this end, the new modules built by Ken B. are visible, as well.  I'm thinking the brown is good for bare farm dirt, but these are for the Taki-Tiki.  So, being island or beach scenes, I'm wanting a more sand-colored paint for areas where the ground cover may be missing.

In addition, I've some other modules in severe need of scenery.  So, I guess that I've at least a dozen and a half of the buggers to keep me busy through the summer.

Another project is almost done - the fume hood for the work desk.  That'll be on point after lunch.

Hmmm, just enough time for a quick nap before lunch.  Bye ...

Friday, June 14, 2019

Two steps forward, (only?) one step back

I started to paint the six modules for the double deep set.  Yes, I knew, I should have painted them before applying track, but I was in a bit of a hurry to try my "great" idea.  And, I was right - it works as envisioned.

Then came the move, and the shoulder injury, and two surgeries, ending with a reverse joint replacement. And therapy. And therapy. And, did I mention  therapy?

But here in late spring, I'm feeling like doing the next step in building the module set scenery.  At first I thought I could, carefully, paint the box with the track in place and not make a mess. Ha, what fool me!

So, yesterday and today, I removed all the track on all six modules.  Now I can repaint them at will  and not worry about tracks, turnouts, yada-yada.

One of the Tomix turnouts was damaged in the move here.  A replacement has been obtained. 

Before I start to reapply the tracks, I need to sit down and make a detailed diagram of how the set will be wired.  Any one module will be capable of being used in a layout, separate from the others.  But, when used together, they are the end of a TTrak loop.  As such, I intend that power junctions be concentrated to one, or perhaps two places, the Outer and Inner loops. Or red/yellow, or whatever your preference is.

On the "other" project, with the Taki-Tiki loops behind the mains, most of the track pieces are in hand.  The rest will be here, once they "swim" the Pacific - ha.  I'm expecting them when they show up, and not before.  Once all that is in hand, Track laying can begin.  Oh, fun, two major module projects in progress at the same time.  This is from "Mr. Can't-Multitask-Very-Well."  We'll just see how I do with this.  But at least, all track pieces for the 10 modules is/will be here.

I'm a bit short on Tomix rail joiners, and forgot to order any.  But I did discover, a while back, that Atlas joiners work just fine.  Especially when mixing brands of track.  So, no problem there.

I guess I should go paint some in what's left of the afternoon, but I think a nap is going to win that scheduling battle.

All you guys, have a great Father's Day!  And you gals, I hope your Mother's Day was great, too!


Saturday, May 25, 2019

The Taki-Tiki Rwy

Recently, I posted here a blurb concerning the Trans-Tropics Railway, the "Taki-Tiki."  A bit of progress has been made, so here's a small follow-up on it.

After playing around in AnyRail (always a dangerous thing for me to do) I've added an end loop to the module set, bringing the total to four.  In use it'd look something like this:


Now, the two corners on the right will be built as a single 180º end loop.

As a linear setup: 


Either way, this gives the Bandai Shorty trains a place to run, switch, whatever on their own with a minimum of interference with the "full size" N scale trains on the TTrak Inner track. 

I'm thinking that I'd run the trains so that the connecting sections between the larger loops would run counter to the Inner line.  This would allow periodic use of the Inner to move between loops and the connector as a return.  Really, I think most action could be kept separate.  The little Bandai locomotives are, basically, double ended, so no turning of a loco is needed to run back and forth.  I'm thinking that an entire show could be done and never need to leave the loops.

I have most of the track on hand or on order.  I'm anxious for it to get here so I can trial run the loops on a bench.  I've made contact with Ken, who's building module bases for others. I have contracted with him to build four for me.  These would be the two triples, a double, and the end loop.  Along with the double deep module set, I've got my summer's work all lined out.  Ha - I'm positive it'll get changed for me. I do believe in Murphy.

Being the Taki-Tiki, it'll be a sandy beach scene set.  I'm not too sure if I can, but if I can manage a few grass hut style buildings, I be a happy modeler.  The building outlines on the drawings are just place holders to give me a feel for space.

Like the double deep set, I see this as a module set that's capable of being a stand alone, small show layout (like school displays) as well as part of a larger club spread at shows.  Not to mention, a set up for home on a table or two.

Saturday, May 18, 2019

Plans, they are achanging - - -

I've been struggling with some items lately.  A stomach bug that floored me, completely. I lost my truck keys on Wednesday, too. My daughter-in-law's favorite grandfather passed away at 98.  He served on a Fletcher-class destroyer in the South Pacific in WW2.  His services were on Friday. The dentist is enjoying my trips much more than I am. What a week.

The one modelling issue that has bugged me the most is the six-module layout. 

I've decided that the inner tram loop takes too much space from scenery concerns.  So, it's going away.  Well, not too far, but to another possible project.  As soon as I find those missing Kato Hanover trams, that is. The track plan for that is derived from R. D. Kerr's Easy Trolley pages (http://www.trainweb.org/tomix/.)


Now, some of the larger structures stockpiled for here will actually fit.  More details later, as the modules progress.  First, there's a bit of repair and painting to do.  There's a base coat of paint, and then some track repair.  One of the Tomix turnouts was damaged in the move here, but a new one in somewhere "over the water" as the saying goes.  The single crossovers were originally a double Kato unit, but it, too, was destroyed by the move.  So, I'm bashing four (a pair each of L's and R's) Kato #6's into a pair of single crossovers. They make a perfect 310mm for a single, as did the factory DXO.  This is following a video by Mike Fifer of Fifer Hobby Supply.  Thanks, Mike, for all your support for the hobby.  When finished (soon, hopefully, but don't hold your breath) I'm planning to shoot a short video of them in action.

Also, I've had a bit of minor trouble keeping the module feet on the table.  Being double deep, they are just on the edge and the slightest bump slides them off.  So, a simple solution.  Each foot is in a 2x2 block bracing the corner of the module box.  I'm going to add another 2x2 just inside the existing ones and move the foot there. Problem solved. The blocks are cut, and come Monday (forecast to be rainy and stormy - can't mow, but can work on my important projects in the barn!) I'll drill and glue the new blocks in place.  Adjusting them is not an issue. I've been converted to the top-adjust system for my new construction, with consideration of retrofitting my older modules.  By the end of next week, I should have the painting all done and basic ground cover started.

The nichrome wire for the new hot wire cutters came in this week.  100' of 22AWG is a lifetime's supply, especially sharing it with a few local modelers.  You can be acquainted, but swapping and gifting goodies makes for good friendships, I've found.  Anyway, easy foam shaping (Stanley Surform tools are great!) allows for a more "vertical" scene, if only by a little. 

That's about it from here.  Now, if I could only find those lost keys . . . 😡

Friday, May 3, 2019

No rain - yet

Since the last post, it has rained another 2.75", making 3.75" for the week.  None today, but there are storms out west coming this way. At least the moss in the yard will like it. I guess.  Sandy ground, and puddles stand almost long enough for bugs to breed.

Yesterday was a fun day - not.  It started with a root canal and finished with a major grocery shopping trip.  Since it's about 25 miles to the store (and dentist, and ...) I decided to force it and help get the job done.  Benefits include staying home all day today, and saving the gas.

I managed to work on a couple of projects.  Since I like for my railroad modules to have something other than the "plywood plains" look, I use foam for terrain contours.  In the move, I lost my three homemade hot wire foam cutters, named the "Foaminators" by another modeler.  They were made from 1/2" PVC and brass bolts with nichrome wire.  So, I needed a new set.  One stick of pipe is enough for these three. The power leads are low voltage lighting cable. 


I power a cutter with a variable dc power supply I have from my ham radio daze. I did make a second power supply from an old car battery charger.  I have found about 2A current is plenty, and it only takes a few volts to do the job. I use 22ga. nichrome wire.  Pictures later, I expect.

Two words of caution: First, always have a lot of ventilation.  The fumes are toxic, toxic, toxic.  I'll do my cutting in the garage with the doors open.  We have a back door in there, so there's a good breeze when it's open.  The second place is ni the barn, near the open overhead door.  When in doubt, I also use a box fan (it was my grandmother's - nearly 50 years ago. Still runs good.)

Second, the wire is HOT! Don't ask how I personally know this. Please.  When running a hot wire cutter, if the wire starts to glow, it's waaaaay too hot. 

Also, did I mention the fumes are harmful? Use ventilation - outside is best if you can.

Number 1 allows me to reach into the interior of a wide sheet.  I have built mountains from only one piece by using tapered cutting, and stacking the cutout on top and repeating.


Number 2 has about 16" cutting span.  That's enough to reach across an Alt TTrak straight.  With that, I made the Ranch module in one pass.


It's a plain double module box.  I flipped it upside down, and free-hand drew the terrain contour on the fascia.  Same thing on the back, but I made sure that there was a bit of difference in them.

Then, in went the foam, glued in tight.  Once set (it was a day or two before I got back to it) I slid the wire of cutter #2 along the wood profile, keeping in contact the whole way. A little wiggling also helps with the shaping.  It was that easy.

Cutter #3 is the smallest of the three, but is a bit wide.  I've used all of them in one way or another.

One way I'll mention.  I clamped #2 is a work-mate table, with a piece of ply added.  The wire is at an angle, with one end into a slot in the edge of the plywood.  By sliding a sheet of foam through this, a slope is cut.  Setting the wire angle allows for managing the grade, if using the piece for roadbed.

How you can use one (or all) of them is limited by your imagination.

Oh, did I mention? LOTS of ventilation, the fumes are toxic!

Wednesday, May 1, 2019

When it rains

Another 1" of rain last night.  I guess it's trying to keep the moss in the yard from drying out.

A little more on the Taki-Tiki design.  I messed around with it a bit more, and added a shorter (2') module between the 3' pieces. 


This adds a connector between the two switching areas, off the community tracks.  I'm thinking these three modules, with Taki-Tiki facing the front, could be a stand-alone display for a one day (or even 1/2 day) school or library display. I've done a few of them in my time, and had fun doing them.  Ah, the good old days.

After checking my track stock, a small order for a few pieces more and this project is crowding its way to the top of the to-do list.

Another small layout I've done is called the Booville Central.  It's based on the Microtrains Haunted Hamlet collection.  The set of buildings come with a single round base.  I wound up with two bases, but that's a long, boring story for a never time.


I make a loop of Tomix C177 (7" radius) on each base, along with a few buildings.  A tram is run there.  I favor the Kato Hamburg trams or the Pocket trains for these.

Then, a Figure-8 using 249mm radius Kato surrounds both bases.  A small passenger train loops around on this track.  So, on one table, a Halloween village with three trains! 

I prefer dark blue (for water) or black (it is Halloween, after all) table covering.  I'm having good service out of the cheapest queen flat sheets I can get.  One covers a 6' table just fine.

Booville at a library

Yeah, the video calls it something else, but Booville Central is what it's become, and what it'll probably stay.  Well, it's time to shut this thing down and get to the barn and work on some good stuff. 


Sunday, April 21, 2019

Far too busy . . .

to do much modeling.  Dr. visits, are the worst culprits, as it's ~30 miles each way.  So much for living in an idyllic small town.

The fan is mounted, but no pictures yet.  It's almost dry enough (after 2.75" rain the other night) to do some yard work and fence repairs.  Humbug. 

For some time now, I've been doodling a small switching layout that's spread across some small islands, The Trans Topics Rwy.  Or, as the natives call it, the "Taki-Tiki Rwy."  It is designed in Tomix Fine Track.  I do have a stock on hand. This leads into the rest of this blog:

Joshua Murrah, on the TTrak Facebook group, posted something about building a small yard on the rear part of a module for use by Bandai Shorty trains.  Well, since I do have some, one thing led to another.  after a couple preliminary drawings, I came up with one which seems very achievable.  Note that each of these is 930mm (~3') long and 350mm (~ 13 3/4") deep, just less than an Alt corner.


By using mostly C103 (mm, 4")  curves it turned into a small yard complex, and perhaps a town.  I did look at interleaving the yard tracks, but like them better this way.

To go with it, another was laid out.


It features the same basic loop and TTrak inner line interface as the first.  Here, I used a pair of crossing sidings and a possible view block.  By this time, I was beginning to see these as portable micro layouts.  Something for a quick and easy show for a 1/2 day at an elementary school.

The late Carl Arendt defined a micro layout as one with not more than 4 sq. ft. of area.  That's 576 sq. in.  These are ~505 sq.in.  Of course, he was thinking in larger scales, such as Gn15, but his definition does not restrict the scale of train used,  only that it's not a static scene.  It must DO something.  Check out carendt.com, his website that is still being maintained.  Very informative, it is.

After looking at this, I stuck the two together, and ...


This looked like a bit of fun, and since AnyRail does export to TrainPlayer, I did that.  A couple of fun evenings later, I left it like this:

Look closely. There is a train (steam, with caboose, of course) and a freight car on each siding.  Every freight car started out where the train sits, and was moves and switched into the resting location. 

Yeah, I already have far too many projects, but these have inserted themselves rather high in the "to-do" list.  Perhaps, the Taki-Tiki is coming to life?


Friday, April 12, 2019

Sniffing Glue

That's something I'd rather not do.  So, in my "office" (a spare bedroom) I have an access panel installed in the window.


One of my other hobbies is shortwave radio (including ham (amateur) radio.) The original purpose of the panel is to provide a number of antenna and cable connections between the (comfortable) inside and the (constantly changing) outside world.  It's a commercial product available at most ham stores.  After trimming it to fit my window, I stared at the blank end for a long time. 

It finally dawned on me (I can be a bit dense - no comments, please) that perhaps a pass-through for a vent could be added.  I cut a hole for a piece of 2" PVC pipe, and glued it in place.  A 45º elbow was added inside and outside.  The inside faces up, while the outside faces down to not catch rain. (Another 2" is forecast for tomorrow. Good - the moss in my grass was about to wilt. 😐)

The outside port is equipped with a stainless PVC screen to keep out bugs and insects.  I found it online - where else?


On the inside, I keep a cap pushed on to close the air flow when not wanted.  Then, I went spelunking in the depths of the barn for a muffin fan.  I found a couple 4" 110VAC fans.  So, a 4" to 2" PVC reducer was obtained.  A thin piece of plywood was cut to about 5" sq. and a 4"hole cut in the middle. This is attached to the reducer with small 90º angle brackets and #6 hardware.


Before it's finished, I will caulk around the joint to seal the air flow.

Finally, the fan will be mounted on the plywood adapter. Once I make another trip to a hardware store in the next few days, that is.


To use, I'll pull the cap off and push the fan assembly onto the interior end if the pipe through the window.  A bit of foam-core board will make a small fume hood.

I won't try painting with this, I just want to pull the glue fumes outside.  Since most of the items are small (N scale buildings, etc.) I don't think a big, space hog of a hood is desirable.  I do plan a test using match or candle smoke to see if it draws as well as I hope.  I'm just wanting it to be enough to control the fumes.

With all the tasks and Dr. visits, that's about all there is for this week.  I hope the rain holds off long enough for me to apply the "weed-n-feed" in the morning.  We'll have to see how that develops.