Here are a few pictures to show the small progress I think I'm making out in the shop.
I built eight (!) 2x modules, but Darrell took two, and Cal gets one of these, so only five
I built eight (!) 2x modules, but Darrell took two, and Cal gets one of these, so only five
are left for me. That's great, because now there are four TTrak-N modelers out here!
 I think I'll only need four to start with (and
 maybe finish?) so there is a spare. Since I
was going to build so many, I just mass
produced as many as I had material for at
the time. It was much quicker that way.
One saw setup, several passes, and a whole
pile of module kits fall out of the sawdust.
I got to thinking again. Sometimes it just happens. Oh, well. Anyway, it occurred to me that
the high rise buildings on the first of the corner modules would look a bit more imposing if
they were on a raised surface. I looked around the shop and found a scrap piece of 3/4" blue
foam. I cut it to size and shape, and tried a train around it. No good, the cars would scrape
the wall. So, a bit of knife time beveling the slope and the cars now clear fine.
I set the Tomix 4018's on there and looked at it from all sides. I decided the front edge needed
I set the Tomix 4018's on there and looked at it from all sides. I decided the front edge needed
some elevation, too, so another scrap was cut out.


Next, the train was placed in the trench, and given a good look. Something still didn't look
quite right. While I like the low ridge in front of the tracks, it seemed to undo the elevation
of the buildings.


So, a few more foam scraps, and the buildings were elevated another 3/4".
The train was placed back in the trench, and that looked better to me, so this is what I will
go with.


The foam piece will be glued down to the module top, and another piece will be cut to fit on
top of it.
This new piece will have a vertical wall to match the top of the lower piece's outline at the
top of the taper. Since I'm about out of 3/4" foam, the new top piece will probably be 1" thick.
I really like the look from 'pedestrian level' at the base of the buildings.
Finally, I set out to join the two 6x straight modules. Part of the idea for these long modules
Finally, I set out to join the two 6x straight modules. Part of the idea for these long modules
is to span between tables. So, they were framed with 1-2" cabinet grade plywood. Even so,
they are fairly light weight, even when handled together. At the last show, we found that,
as separate pieces across a table gap, they were too easily bumped and slid around under
the track. All was new, nothing fastened at the time.
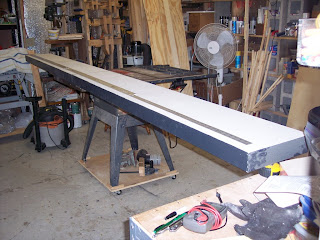 The metal rulers are shown aligned with the
 The metal rulers are shown aligned with the
 front edge of the front track. Conversations
with the others in the club raised the option
of using them as we did, a 12x long through
yard, or as a pair of 6x stub yards separated
around a layout.
So, I thought about all that, and decided to try this solution. The two sections are bolted
together, when desired, by 1/4"-20 tap bolts. These are the same type I use for the
adjusting feet.


To accommodate the need for track overhang when the modules are separated, and for
snug spacing when joined, I placed a shim plate between the sections. The plate is a piece
of 3/32" ply from the R/C aircraft corner of the LHS.


My plan is to lay track starting from this junction. I will place the initial track joints centered
over the plate. Then, when separated, there is a slight overhang for module joining, and with
the spacer, all can be rigidly bolted tight.
 I aligned the modules by standing them on their rear
 face, making sure the tops were flush, much like I'd have
to do at a show. Then, after clamping them securely, a
pair of 9/32" holes were drilled through both ends and
the shim plate. Installing a pair of tee-nuts completed
the job. The assembly is rigid, showing no flexing when
handled, and easily picked up by one person.
For tonight, I am storing it on end along one side wall
of my shop.
I still haven't figured out exactly what little landscaping
I still haven't figured out exactly what little landscaping
I'll use. There will be a few structures, but not many.
Currently, I have a Pola single stall brick engine house
and a Stewart diesel servicing facility for fuel, water,
and sand. These will go at one end, where a couple of
stub sidings will be placed. Look at the pictures in a
previous blog for details.
Somewhere along a siding will be a Greenmax car washing station. It'll probably be on the
rearmost, but that's not a given. I may move it in one track for survivability during transport.
More on that in a minute.
At the far end, if I can figure a way to incorporate it, will be a small steam facilities, but that's
At the far end, if I can figure a way to incorporate it, will be a small steam facilities, but that's
in the distant future.
As for transport and storage, I'm going to cut a pair of plywood panels the same width as
As for transport and storage, I'm going to cut a pair of plywood panels the same width as
the modules (12") and 18" tall. They will be attached with bolts, stacking the two modules.
At 18" tall and just over 72" length, they will fit the bed of my F-150 with the solid cover
closed.
So, that's about it for now. I'm starting to look into the structure kits I stockpiled over the
So, that's about it for now. I'm starting to look into the structure kits I stockpiled over the
winter and spring, getting ready for the summer work season while school's out.
Sooo many toys, sooo little time, sooo many honey-do's ...


